Wednesday, November 11, 2020

AnyDesk vs TeamViewer: Which is a Better Remote Desktop Software


Remote access software solutions have become a necessity in many organizations across the globe and used for various tasks such as accessing files from a remote location, software troubleshooting and transferring files remotely.

These software solutions help organizations in reducing the time and effort taken to resolve issues related to a software or operating system remotely.


Staying Connected with Best Remote Access Software

There are numerous remote access software systems available in the market, today that come with an array of features. However, it is crucial to choose the software the fulfills all the requirements for your business or organization.

Therefore, we are going to compare two of the leading remote access solutions available in the market today — TeamViewer vs AnyDesk.

Pros of TeamViewer:

  • TeamViewer Free Download and Installation: TeamViewer download is easy, as even its latest version is compact and can be installed on all major platforms effortlessly.
  • Cloud-based Services: It also provides users the option to directly access TeamViewer through any browser, without having to download and install the .exe file.
  • Drag-and-drop: It provides an easy drag-and-drop file transfer feature, which makes file transfer as easy as copying and pasting files from one local drive to another.
  • Designated Access: It allows authorized users to access files without having to go through the two-factor authentication process.
  • Multiple Simultaneous Sessions: TeamViewer 12 and the above versions gives users the ability to perform multiple sessions simultaneously under separate tabs.

Cons of TeamViewer:

  • Large File Sharing: While it is ideal for sending and receiving files with small sizes, it doesn’t allow large file sharing. In addition, when its file-sharing capability reaches the upper limit, it begins to lag.
  • Proxy Server: TeamViewer is designed in such a way that it cannot operate on a proxy server. While this has been done to make sharing of files more secure, some users who use proxy servers might find it inconvenient.
  • Low Efficiency with Low Bandwidth: Often, if the internet bandwidth is low, the software’s efficiency decreases and its features such as cursor control and file transfer lag.

Unique Features of TeamViewer:

  • Secure Remote Access: TeamViewer helps users gain access to a remote system by sharing a unique randomized ID with the other person using the remote desktop. Users will not be able to gain access unless they don’t authorize the session.

All the latest versions of TeamViewer inclusion version 12,13 and 14 are encrypted, for additional security, with AES session.

  • Multiple Platform Compatibility: TeamViewer is compatible with all popular operating systems, macOS, Linux, including Windows and Android. In addition, TeamViewer also provides cloud-based management services, which enables users to use TeamViewer on browsers without having to install it.
  • Remote Hardware Access: With the help of TeamViewer, users can give commands to the hardware connected to the system. Functions such as remote access to the printer, cursor and even shutting down/restarting the system can be executed with the help of TeamViewer. 
  • Text, Audio and Video Communication: TeamViewer comes with efficient tools for real-time communication between the local and remote users.This helps both the parties to exchange information, reports and insights during sessions.


Pros of AnyDesk:

  • AnyDesk Download and Installation: The installation file is of 1.1 MB, making it one of the lightest remote access solutions in the market.
  • Low-Latency: AnyDesk is really fast and its remote access screen works almost as quickly as the local system.
  • No Session Limit: Unlike many other free remote access solutions, who have a session limit, Any Desk has no time restrictions or pop-up timers. In addition, it requires no sign-up or personal details.
  • Responsive Interface: It is quite responsive in terms of latency and has several features to support keyboard inputs.
  • AnyDesk for Mobile: The makers have customized the AnyDesk app for mobile platforms such as AnyDesk Android, AnyDesk for MacOS and AnyDesk for Windows.

Cons of AnyDesk:
  • Copy and Paste: Copy/paste might be an issue as many remote users couldn’t copy text from the remote machines and paste it into their own device. This bug is reportedly fixed in the latest version.
  • Resolution Glitches: In some cases, adjustments in the resolution of remote desktop do not work properly.
  • Installation Required for System Files: If users need to make changes or access the system files, they are required to install the software in their local machine. Browsers aren’t authorized to access system files for security reasons.
Unique Features of AnyDesk:
  • Remote Server Monitoring: AnyDesk allows users to monitor all the workstations on a server and to perform functions across the local network such as transferring files, installing application and troubleshooting. AnyDesk for Ubuntu has been made as compatible for remote server monitoring as AnyDesk for Windows.
  • Mobile to PC Remote Control: AnyDesk allows users to access remote computer systems from personal computers as well as from iOS and android mobile devices with AnyDesk App. With the help of AnyDesk app on mobile devices, users can perform most of the tasks that can be executed from a computer, such as file transfer, desktop access, printer access, shutdown, and restart, to name a few.
  • Whitelist: AnyDesk provides the whitelist feature to its users through which they can allow selected users and devices to freely access a particular system without asking for permission repeatedly.
  • Widget-inspired User Interface:  With its latest update, AnyDesk has revamped its user interface taking inspiration from widgets. It makes various tasks necessary to maintain the workflow, such as file transfer and quick commands, seamless.
  • Multiple Language Support: AnyDesk comes with multiple language support, which makes it easy for users who aren’t fluent in English to use the software seamlessly.


AnyDesk vs TeamViewer: Which is Better in Terms of Performance?

AnyDesk for PC provides better navigational properties and a user-friendly interface with quick commands. TeamViewer, on the other hand, provides a variety of features for communication and is ideal for light file sharing. Hence, in terms of performance, both are equally competent.

AnyDesk vs TeamViewer: Which provides Higher Flexibility

You can use TeamViewer for integrating with third party applications like Zendesk and Cherwell Microsoft Intune Salesforce. In addition, it is compatible with operating systems such as Windows, Linux, and macOS. It is free for testing and provides the flexibility of cross-platform access.

AnyDesk on the other hand, is compatible with Raspberry Pi, along with other popular operating systems. While it can be integrated with other third-party application, to do so, you need to get REST-API and documentation for domain and authentication.

TeamViewer vs AnyDesk: Where Your data is More Secure

TeamViewer is well-known for its AES session encryption for additional security. It also ensures a two-step security feature for its sessions.

AnyDesk’s infrastructure provides a secure environment for remote connections. It uses bank-standard TLS 1.2 encryption technology for safekeeping user’s data and RSA 2048 asymmetric key for every session.

AnyDesk Vs TeamViewer: Which Ensures Better Compatibility

In terms of compatibility, TeamViewer has a slightly upper hand as it supports all possible client versions. TeamViewer is compatible with Windows 2000 SP4 to Windows Vista, Windows 7, Windows 8.0, Windows 8.1 and all possible Windows 10 versions.

On the other hand, AnyDesk is mainly compatible with a fewer versions of Windows XP, Windows 7, Windows 8 and Windows 10. Also, it doesn’t support iPadOS TeamViewer is also compatible with iOS 10, but AnyDesk supports starts with iOS 11 and later.


Author Verdict

Looking at all the factors from the two leading solutions, I prefer Anydesk for a better remote desktop software because its easy to use and doesn't required you to come up with registration after so many usage.

Thursday, October 29, 2020

How to Track a Cell Phone Location Without Them Knowing

Tracking a cell phone location is not something you only see in movies. As a matter of fact, a lot of people commonly employ cell phone tracking apps to know where their loved ones are. Not only that, even employers use phone tracking on their employees' devices.

Tracking a cell phone location is not just a matter of comfort or convenience anymore. With all the crime going on out there, knowing the exact location of your family members lets you know that they are safe and no harm is upon them.

If you're wondering how to track a phone, there are a lot of ways to do it. However, each way has its own benefits. Also, not every way can give you someone's location without them finding out about it.

In this article, I’d be introducing you to the concept of IP addresses and how they help you achieve this feat. I’d also be introducing you to a tool — Grabify, Which basically makes use of IP addresses to get you the info you need.

Let’s proceed.

What the heck are IP addresses?

Think of this in its simplest form, as a unique ID or number assigned to every user of the internet to help differentiate them. This special number in turn, helps in knowing certain things about the bearer, which approximate location happens to be one of them.

Special emphasis laid on “approximate” above, because the location provided can be affected by a couple of factors and might not be precise. But most times, you’re usually not very far from the location received.

What is Grabify:


Grabify is a free web-based IP grabbing/URL shortening tool. (IP grabbing just as it implies simply means getting/grabbing peoples IP addresses. )

Just as you might have wondered, Grabify isn’t the only tool out there that does this job, there are a whole lot of them.

I chose Grabify for its simplicity and its straight-to-the-point design. A quick Google Search would show you how popular and widely used it is. In fact, as at the time of writing this article, it currently has 66,073,484 IP logs recorded on its database. 

Alright, So How do I use Grabify to know someone’s location?

It’s as easy as sending them a link!

Yea you heard right. You don’t have to be that weird kid who hasn’t got a life, always sitting in front of a computer screen, with hoodies on, the hacker way.

Grabify abstracts the whole technicalities and just gives you only the information you need.

So, Here’s how to do it:

  • Find a link to any topic of interest that you’re sure your friend or “catfish” wouldn’t resist visiting.
  • Head on to Grabify and paste that link into the box that says “Enter URL or tracking code" you’d see this on the homepage.
  • Click on “Create URL”. You should see a pop up that asks you to agree to their terms of use, you should click agree. If your URL was successfully created, you should now be taken to a new page with a handful of information.

On this new page, there are a couple of customization's you could do to your link and how creative you get might be limited to your knowledge of a few technical stuff about URLs. But for the sake of being straightforward, we’d go with the defaults.


Here are the important things to note :

1. Your new URL. This usually looks like “https://grabify.link/ABC123”. This would be what you’d be sending the “catfish” or friend. It’s advisable to change the domain to something else, so your victim doesn’t get to know it’s a grabify link cos of its popularity.

2. Your tracking code. This would be what you’d enter to access your logs.

3. Your access link. This link helps you view your logs by directly visiting it. This can save you the stress of coming back to the homepage to enter your tracking code anytime you wish to view your logs. You might want to copy that too.

4. Smart Logger Feature. This is a new feature recently introduced by grabify to give additional information about your victims. Such information includes, your target’s device orientation, its charging state, battery percentage, his/her device’s GPU, if he/she is accessing the link over a Tor exit node, if they’re accessing over VPN and a whole lot of cool info. You might want to turn it on.

After you’ve taken notes of these and are done with your customizations, you’re ready to send out your link.

Hit up your friend or “catfish” with the new link and maybe attached with a couple of descriptions that’d make them click on it. (Remember to get creative with this).

After you’re sure they might have clicked (if they hopefully did), or after you must have asked them if they’ve checked out the link, (you’re free to ask this cos they usually don’t know what has happened behind the scenes, cos the original information that has that link is what opens up to them). Head on to Grabify’s homepage and enter your tracking code, or better still, use the access link you had already copied to take you straight to your logs.

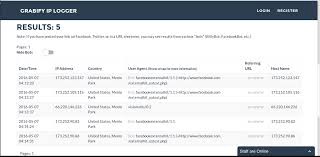
Now you should see the Results section, updated with real data about the target that has clicked the link. This includes his/her location! Be sure to click on “more info” to see more data about the user. If you’d turned on the smart logger, you should see a more detailed info than the default one provided.


Note: Grabify keeps track of anyone who clicks on the link including yourself.

So, Yay! You just found someone’s location!

Thursday, June 11, 2020

PC connected to Internet but Browsers cannot Browse

Question:

I have a desktop that apparently received a microsoft update to IE 11. Now, even though the PC is on my network with an IP (and traffic such as updates, carconite back ups and usch are working fine) IE 11 cannot connect browse the internet? I can ping websites from the command prompt succesfully, but IE cannot dispaly the page. I loaded firefox mobile to a USB drive in an effort to try another browser and it will not work either. I have checked all security dsoftware and nothing i sblock ourbound traffic. I am stumped....ideas ?

Answer:

One thing you may also want to look at which has not been mentioned here - has saved my bacon a couple of times when looking at this exact issue of ping, dns resolution working but no browsing; Manually reset the Winsock and the TCP/IP Stack.

Start CMD as Administrator and run the following commands, then restart the PC:

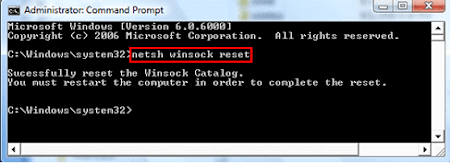
netsh winsock reset c:\resetlog.txt

netsh int ip reset c:\resetlog.txt


So, What is the Netsh Winsock Reset command? 

Netsh Winsock reset is a command prompt program to reset the Winsock catalog back to default settings or clean state. You can use it if you are having Internet access or networking problems but failing to resolve the issue after trying all other solutions. This can be useful if a malformed LSP is installed, which is resulting in loss of network connectivity.

While the use of this command can restore network connectivity, it should be used with care because any previously-installed LSPs may need to be re-installed.


How to perform Winsock reset in windows 10?

To perform a Winsock reset in windows 10, perform the following steps :

1. Click on Start.

2. In the Start Search box, type cmd. Right-click on command prompt and select run as administrator.

3. Type netsh Winsock reset in command prompt box and then hit the Enter key on your keyboard.

4. After it has finished resetting, you will get a message ‘Winsock reset completed successfully.’

5. That’s it, restart your computer to finish reset Winsock in Windows 10.

Similarly, to reset TCP/IP, use command netsh int TCP reset in cmd.

Sunday, May 3, 2020

How to Prevent, Detect, and Protect Yourself from Phishing Attack

What Are Phishing Attacks?


Contrary to many people’s belief, the criminal act of hacking doesn’t always involve fancy or complicated software (viruses) to get into company systems or individuals’ computers. Granted, malware does play a part, even in phishing, the primary means of attack exploits a different kind of vulnerability – the end-users. 

Phishing attacks are nothing more than fraudulent attempts by cybercriminals to obtain personal or sensitive information (usernames, passwords, email contacts, SSNs, medical, financial, customer data, etc.). They do this by posing as a trustworthy figure or entity and communicate with their victims predominantly over email or instant messaging. Once trust is established, the victims will be redirected onto a fake but legitimately-looking website where they’ll be asked to enter their personal information. 

Phishing makes use of something called “social engineering.” In the context of IT security, social engineering is the psychological manipulation of internet users into performing specific actions against their best interest. Also, it is to have them divulge information such as usernames and passwords.

In most cases, this is only the first step as part of a larger fraud scheme to, either gain access to more people or to infiltrate a company’s system by using the employee’s (victim’s) credentials. 

The truly frustrating part about phishing attacks, among all other types of cybercrime, is that they’re the easiest to protect against. Despite this, they are also the most absolute and successful; wreaking havoc across the digital space. 


How to Identify a Phishing Attack

Phishing attacks come in different shapes and sizes. Nevertheless, there are specific common characteristics that most have in common that will help us identify a potential phishing attack. In broad terms, however, most types of phishing attacks can be broken down into two main categories based on what they try to get the victim to do. 

1. Handing over sensitive information – These types of emails and messages are trying to trick people into thinking that they’re talking to a trustworthy source such as a bank, a service provider, an online store, a governmental entity, social media platform, etc. The purpose here is to convince the victim into divulging sensitive data – most commonly usernames and passwords. Usually, these emails will look quite authentic, with a legitimate content format, logos, and everything. The message is tailored in such a way to convince people to provide their username and password. They will usually be asked to click on a link, which will redirect them to a malicious web page where they submit this data, allowing the hacker to access their accounts.   

2. Downloading malware – These types of phishing emails aim to get victims to infect their computers with malware. Like with the examples above, these types of emails will be presented as originating from a trustworthy source and directing victims to download an infected document, .zip file, etc.  These malicious emails, however, can also take on other forms. If a friend’s or coworker’s email was compromised, hackers could send you downloadable malware from their account. Similarly, HR staffers could receive emails from pretending candidates with a “resume” containing the malicious embedded code. The possibilities are almost endless. 


Different Types of Phishing Attacks

Another way of classifying phishing attacks is in terms of their targeting method. While some attacks use no specific targeting and are sent to thousands of inboxes, others are tailored towards specific people. Below are some examples of phishing attacks:

1. Bulk Phishing – The most common type is the bulk phishing. These are the most easily-recognizable, contain mistakes, inconsistencies, and are generally roughly-made. They’re sent to hundreds of thousands of inboxes, hoping that some will fall prey to the scam. 

2. Spear Phishing – Spear phishing, on the other hand, is more targeted. It will use personal information (name, position, company, phone number, and whatever primary data they have on you) to convince you into following their commands. 

3. Whale Phishing – Also known as “whaling” this type of attack is similar to spear phishing but aimed at the big fish – CEOs, board members, or others in key management positions. Even though hackers need more time and energy to gather data and tailor the emails to perfection, the payoff will be well worth the effort. 

4. Clone Phishing – This attack will target specific individuals or organizations by copying/cloning a previously sent, legitimate email and making it look almost identical. It’s then sent to the target containing a corrupt link or attachment. The email is also spoofed (forged sender address) making it seem like it came from the original sender. These are often made to look like a resend or update of the initial email. 

5. Pharming – Instead of baiting people, the pharming attack targets a DNS server, changing the IP address associated with a website you want to access. So, even if you enter the correct name of the site into your browser, you will still be redirected to a malicious version of that page. 

6. Tabnabbing – Similar to pharming, tabnabbing doesn’t target the victim directly. Instead, it loads a fake page in one of the user’s open tabs. If, for instance, you visited your banking account at some point but left that tab open, hackers could replace it with an identical-looking one – just waiting for you to reintroduce your username and password sometime in the future.  Both pharming and tabnabbing can be prevented by using a two-step verification (2SV) security system or by observing the “https://” at the beginning of the website address. Secure websites always start with “https://”


Phishing Attack Red Flags 

So, how can you tell if you are a target of phishing emails? Well, as we said, there are several telltale signs that most, but not all, have in common. 

1. Grammatical errors – Spelling or grammar mistakes, particularly in an email supposedly from a legitimate entity, such as a bank, for instance, is a red flag. Such organizations use qualified copywriters and editors to ensure that these mistakes don’t appear. 

2. A sense of urgency – Phishing emails will often instill a sense of urgency in their messaging. They could say that there’s been an unauthorized login attempt, or that your account has been suspended for some reason, among other such examples. They will then tell you to enter a link and verify your security information. Keep in mind that no actual legitimate entity will EVER request you to do such a thing online. 

3. Vague Identities – Emails that address you as “Dear Customer,” or something similar, or those that don’t provide a signature at the bottom of the email are also red flags of a potential phishing attack. 

4. Odd Requests – Targeted phishing attacks, however, will contain more detail about you. Even these emails will usually require something from you that you don’t regularly receive. 

5. Stories too good to be true – Emails claiming you won some prize and are requesting your personal and financial information to declare it, is a more obvious example of a scam.


How to Keep Yourself Safe From Phishing Attacks?

There are several things you can do to keep yourself, your company, and your sensitive data safe from phishing scams. 

1. Never Give Out Personal Information – As a general rule of thumb, you should never give out personal, financial, or security information over the internet. Trusted entities and organizations will never ask you to do this, anyway. 

2. Don’t Click on Suspicious Links – Instead of clicking directly on a link in an email, hover your mouse cursor over it. Malicious web pages will have strange-looking embedded links. Also, make a habit of checking the address (URL) of a website, even if it looks legitimate. Secure sites always start with “https://”.

3. Avoid Pop-ups – Hackers like using pop-ups as legitimate lookalike components of a site. Most browsers will allow you to block these pop-ups, but if some manage to slip through, it’s best that you don’t click on the “cancel” button, but the “x” in the upper corner of the window. 

4. When in Doubt, Contact Directly – If the email seems suspicious and the purported sender is someone you know (friends, colleagues, etc.) contact them directly to see if they sent that email. Use your phone or other means of communication than the email. If they haven’t sent it, forward a copy of the email to the IT team so they can assess the situation. If the suspicious email is from an entity (bank, school, government, service provider, etc.), research their contact information on their official website, call them, and ask about the email. 

5. Don’t Use the Same Password Everywhere – Hackers are well aware that most people use the same password on different accounts. If they manage to get their hands on it, they may have access everywhere, including your company’s systems. Use a password manager tool to help you keep track of different passwords. 

6. Don’t Post Personal Information Online – Posting too much personal information about yourself on social media (birthdate, education, past employment, relationship status, etc.) can be used against you in more targeted phishing attacks. Try limiting this information as much as possible.  

7. Use Firewalls and Antivirus Software – Firewalls and antivirus software will keep your computer and systems safer from outside intruders. Firewalls will prevent things from getting in, while the antivirus will detect and eliminate them if they do. 

6. Keep Everything Up-to-Date – Though many of us look at system updates and patches as an inconvenience, we could do without, they are incremental in keeping our systems in line with the latest developments in the world of cybercrime. Updates are everything from firewalls, antivirus software, operating system, browser, etc. whenever new patches are available. 

Phishing attacks are the most manageable cyber threat to protect against. It is more of a matter of recognizing the danger and not acting on what the cybercriminal wants you to do. Humans are the first and last line of defense when it comes to phishing attacks so being educated is the best first step in prevention.

There are many ways to keep your business safe from online threats. Use these tips to stay safe online and protect yourself from phishing attacks.

Friday, April 17, 2020

How to Install Windows 10 Using a Bootable USB (Using Microsoft MediaCreationTool)

How to Install Windows 10 Using a Bootable USB

You have plenty of choices to make when installing a new version of Windows on your device. 

If your computer doesn’t have a CD or DVD drive, you may want to learn how to run the installation from a “bootable USB” to quickly set up your operating system.


How to create a Windows bootable USB with the Media Creation Tool

To boot from a USB, you first need to create the USB itself which will be read by your computer and used to boot up. You can find the guidelines on how to create a bootable USB using the Media Creation Tool issued by Microsoft.

1. Open the Microsoft Download Windows page in your web browser and click on the Download tool now button.

2. Save the tool to your computer. When the download is finished, launch the media creation tool and click Accept when prompted to agree to the launch.

3. Select Create installation media (USB flash drive, DVD, or ISO file) for another PC and click the Next button.

4. Set your preferred Language, Windows 10 Edition, and System Architecture. 

    Note: If you can’t change the settings, place a check mark next to the Use the recommended options for this PC option and proceed.

5. Choose the USB flash drive, then hit the Next button and select your USB drive from the list. The Windows installation files will start to download to your USB drive.

6. The download may take a long time depending on your internet speed. Make sure not to disrupt the process until the creation tool has been created.

7. Once the tool has been created, you cannot use the bootable USB until you change the computer boot order, so...

How to change your computer's boot order

Before you can boot your computer from your USB, you first need to change your computer’s boot order to list USB first. This will prompt your computer to read the USB first before it reads the internal hard drive, during startup.

You can change the boot order from your computer’s BIOS setup utility. After you change the boot order, it is time you can install your windows and use the bootable USB you have created.


How to Install Windows using Bootable USB

With your computer’s boot order successfully changed to load up from a USB device first, you can now crack on with installing Windows using your USB’s installation file. 

Note: Make sure you’ve backed up all your files before doing the installation to make sure you don’t lose any valuable data.


Thursday, March 12, 2020

How to Identify Network Hardware IP Addresses on a Local Network

Determine the IP Addresses of the Network Hardware on Your Network


Before you begin, find the default gateway IP address for your computer's network connection. In most situations, this is the private IP address for the router, the most external point on a local network.

Next, use the router's IP address in the following steps to determine the IP addresses of the devices that sit between the computer and the router on your local network.

The router's IP address in this context is its private, not public IP address. The public, or external IP address, interfaces with networks outside of your own, and isn't applicable here.

1. Open Command Prompt. In modern versions of Windows, search for cmd from the Start screen or Start menu. Use the Run dialog box (WIN+R) in any version of Windows.


2. At the prompt, execute the tracert command as tracert 192.168.1.1, then press Enter. The tracert command shows every hop along the way to your router. Each hop represents a network device between the computer on which you're running the tracert command and the router.

Replace 192.168.1.1 with your router's IP address, which may or may not be the same as this example IP address.


3. When the command is complete, and the prompt appears, a message similar to Tracing route to 192.168.1.1 over a maximum of 30 hops displays with a separate line for each piece of hardware sitting between your computer and the router.

For example, the first line might read:

1 <1 ms <1 ms <1 ms nameofdevice [192.168.86.1]

The second line could say:

2  1 ms <1 ms <1 ms 192.168.1.1

IP addresses that appear before the router's IP is a piece of network hardware sitting between your computer and the router.

If you see more than one IP address before the router's IP address, there's more than one network device between your computer and the router.

If you see only the router's IP address, you don't have any managed network hardware between your computer and the router, though you might have simple devices like hubs and unmanaged switches.

4. Match the IP addresses with the hardware in your network. This shouldn't be difficult as long as you're aware of the physical devices that are a part of your network, like switches and access points.

Devices that sit at the endpoint of the network, like other computers, wireless printers, and wireless-enabled smartphones, don't show up in tracert results because these devices don't sit between your computer and the destination—the router in this example.

The tracert command returns hops in the order found. This means that a device with the IP address of 192.168.86.1 physically sits between the computer you are using and the next device, which is the router.


5. You now know the IP addresses of your network hardware.

This simple method to identify the IP addresses of the hardware in your local network requires basic knowledge of the hardware you installed. Because of that, it's likely to provide clear information about your IP addresses only on simple networks like the kind found in a home or small business.

Monday, February 24, 2020

Dynamic vs Static IP Address

It's the difference between a dynamic vs. static IP address.

When you sign up with an Internet Service Provider you will either end up with a static IP address or a dynamic IP address. What's the difference between the two?

Here's what that means.

Dynamic means "constantly changing." The prefix dyna means power; however, dynamic IP addresses aren't more powerful, but they can change (or be changed).

Static means staying the same. Static. Stand. Stable. Yes, static IP addresses don't change.

Most IP addresses assigned today by Internet Service Providers are dynamic IP addresses. It's more cost effective for the ISP and you.

End of story. Well, more or less. If you read on, you'll learn about the difference between a dynamic IP vs. static IP, in non-technical language you can understand.

Maybe you're asking yourself which one should you choose?

Well, you don't, in almost all instances. Here's why...

For most of us, we simply need a reliable connection and our Internet Service Providers deliver a Dynamic IP address to us. It works for them. It works for us.

Sure, the dynamic IP address can change from time to time, but even when it does, you may never notice.

Right now you're probably wondering...

"What kind of IP address do I have?"

And by now, you probably are curious to know if it's static or dynamic.

Here's the good news.

You're on the right website to find out.

It's pretty simple, actually.

Go to our home page and you can see your IP4 Address.. that is your IP Address.

In fact, you'll get all the details on your IP address, including whether it's a dynamic or static.

Now, if you're in the dark about what an IP address actually is, this is all nonsense to you.

If that's the case, let me fill in the gaps.

It's all a numbers game.

An IP address (the IPv4 version, which is the most common) consists of a string of numbers, separated by periods (dots). Each IP address is separated into four segments by three periods.

An example would be: 66.171.248.173

If you're connected to the Internet, your computer will show an IP address...the one that identifies the internet connection you're using at that moment. (NOTE: It identifies only the connection, not the computer user.)

Haven't you ever marveled at how the Internet knows how to get information directly to your computer? It's not magic: your IP address is key (along with many other factors).

For the purposes of this article, we'll put you at home on your computer and talk about the IP address you likely use most often.

Is your IP address static?

If your IP address at home is static, it means that it will remain the same every time you connect...from home. Just keep in mind that an IP address doesn't travel with you. If you took your laptop to a coffee shop and used their wireless network, that IP address would be different. But at home, it would always be the same if it's the static type.If your IP address at home is static, it means that it will remain the same every time you connect...from home.

But I can almost hear you asking, "How can I get a static IP address?"

Well, here's how.

Static IP addresses cost extra and are on request only.

Generally, a static IP address is assigned by request and for a fee by an IT administrator at work, or by you at home.

Here are some static IP advantages:

  • Businesses are better suited for it than residences.
  • It's also better for dedicated services such as mail, FTP and web servers.
  • It's good for creating or hosting computer servers.
  • It makes it easier for geolocation services to accurately assess where you are.

Because of these advantages, it shouldn't be a surprise to learn that it costs more to get one.

Of course, it's not as easy as all that. There's more involved.

That's because it takes some good technical skills to set it up.

Monday, January 6, 2020

How to change your Wi-Fi password and secure your internet connection

 A Wi-Fi network allows you to connect your devices to the internet without the need for bulky ethernet cables. However, to keep your internet secure, you'll need a Wi-Fi password.

Without a password, anyone can connect to your Wi-Fi network. This means that strangers can hog the network, reducing your internet speed. In a worst case scenario, they can even exploit your devices to install malware and steal sensitive information.

To prevent this, you should change your Wi-Fi router's default password.

Doing this is simpler than it seems, although it'll require you to log into your router's configuration page.

Here's what you should know.

How to change your Wi-Fi password

1. Using any internet browser on a Mac or PC, open your router's configuration page. To do this, you'll need to type in your router's default IP address. This is typically 192.168.1.1 or 192.168.0.1 or 192.168.0.254, though you should check your specific router's details, as this may differ. It's often written on the bottom or side of the router, listed as either an IP address or an "access URL."

2. Log into your router using its username and password. The username and password are often "admin" or "user" by default, but check with your router's manufacturer or internet service provider if this doesn't work. Alternately, the login information can sometimes be found on the bottom of the router itself. 

3. Once logged in, locate the "Wireless" or "Wireless Security" option. It'll likely be listed either at the top or left side of the page.

4. In the "Wi-Fi Password" or "Key" box, enter the password you want your connection to have. The safest passwords are long, and contain a mix of letters, numbers, and symbols. You'll likely be able to change your Wi-Fi network's public name (SSID) here, too.

5. Once your changes are completed, scroll down and click "Save" to save the changes. The Wi-Fi password will then be changed immediately.

Once you've changed the password, the devices you've connected to that network may be disconnected. If this happens, you'll need to reconnect them with the new password.

Sample image when you have a TPLink Router